
I made an iOS Tuner & Metronome App last couple of months due to boredom. Suffering from boredom again this month, I decided to write an article on how I implement it.
In this article, I will show:
- How to sample audio from the microphone using AudioKit.
- How to calculate the notes from raw frequencies (of the sampled audio).
I will not delve into how I implement the views since the code is quite bulky and tedious. Similarly, I will not write anything about how I made the metronome, since the mechanics behind it are just some trivial algebraic manipulations.
We divide our tasks into three classes: Note, Pitch, and Tuner. The Note class represents a single (natural) musical note. For example, C (Do), D (Re), E (Mi), C♯, E♭. The Pitch class is used to process the sampled audio, taking its raw frequency and assign it to the nearest natural note. The Tuner class polls the audio through microphone, acquires the natural note through the Pitch class, and calculates the error ratio between the raw frequency and the “correct” natural pitch.
This article will be written in a bottom to top approach, from the Note class, the Pitch class, to the Tuner class.
The Note Class
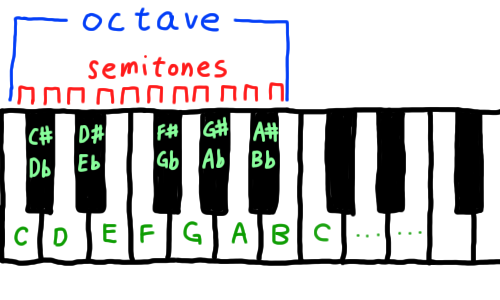
Before coding, we need to understand some basic principles of music theory. First of all, we divide music notes into octaves, each octave consists of 12 notes, and the interval of two adjacent notes is a semitone. They could be visualized easily on a piano keyboard.
By this knowledge, we can write our Note class:
|
|
We combine all the possible Note Name & Accidental pairs (12 notes in total), pass them through init(_:_:) to initialize a Note typed object, and store them in the all array for convenience.
The Equatable protocol is adopted, and the ==, != operators are implemented because we will later use the Array.index(of:) function to locate the current note in the all array. (Note that Array.index(of:) takes an equatable type as its parameter, and returns the index of the object equivalent to the passed-in object if it exists.)
To complete the last part of the Note class, we have to get back to music theory again. In modern times, we set the middle A (aka A4) as our standard of tuning. The middle A is defined as 440Hz, where the next higher A is two times of 440Hz, that is, 880Hz. Similarly, the next lower A is the half of 440Hz, namely, 220Hz.
Furthermore, since there are 12 notes between the higher and lower As, we cut the intervals so that each of the adjacent ones have the same ratio. This is called the Equal Temperament. (Throughout the history, a variety of temperaments have been used, see Musical Temperament. However, most of the digital tuners implement only the equal temperament.) Below is a diagram showing the concept.
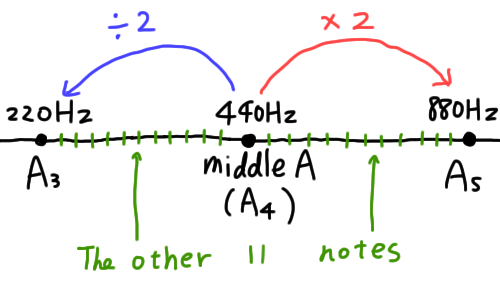
(Note that the intervals are not equally sized as portrayed. [i.e. 440 - 220 ≠ 880 - 440]. The interval between A4 & A5 is actually twice the size of the interval between A3 & A4.)
As a result, we can easily obtain the next i-th semitone of middle A by multiplying 440Hz by pow(2, i / 12). Hence, we can now add a getter in Note class to get the exact frequency of the current note.
|
|
Now we can obtain the exact frequency of every note in the middle octave. Also, as stated before, by multiplying each note by 2, we can simply get the next octave. (By dividing each note by 2, we get the previous octave.)
The Pitch Class
Moving on to the Pitch class. In this class, our aim is to receive a raw frequency, and locate it to the nearest note.
We declare some variables, implement the initializer, and construct an array storing all the notes from 0th octave to 8th octave.
|
|
The frequency variable stores the raw frequency we received, note stores the nearest note to the raw frequency. Since the Note class contains the middle octave (aka the 4th octave) only, we have to declare another variable to store the octave of the current pitch.
In the initializer, we multiply the frequency (of the note of the middle octave) by pow(2, octave - 4) to obtain the actual frequency of the note in the target octave. (This is so because the middle octave is usually defined as the 4th octave. [For example, A in the 6th octave is obtained by 440 * 2 * 2 = 440 * pow(2, 6 - 4).])
The all array may seem complicated since it is constructed by two closures. What I did is generating a nested array, and flattening them. In the outer closure, we loop from the 0th octave to the 8th octave (that is, 0...8), and generate an array of Pitches for each octave. The arrays ([Pitch]) are then filled by the inner closure. It uses Array.map to generate all 12 Pitches in an octave from the Note.all array. Lastly, .joined() flattens the array, making the originally nested array to a linear one. The following form shows the whole nested array before joined().
Now comes the most important function of Pitch. We take a raw frequency, and instance a Pitch object of the nearest note.
|
|
What we do is looping through the all array by .map, and produce an array of tuples called results. It stores the original Pitch object as well as the distance (i.e. difference) between the raw frequency and and frequency of the particular pitch. The results array is then sorted in ascending order by their distance. We take the first item in the array (that is, the item with the least distance), and return the pitch. The nearest note is then obtained.
The Tuner Class
The Tuner class is implemented by utilizing the Pitch class and the AudioKit library. You should first import AudioKit to your Xcode workspace. [Link]
After importing AudioKit, initialize it and declare some related variables.
|
|
In the initializer, we first configure the setting of Apple’s AVFoundation through the AVAudioSession singleton. We specify the category to AVAudioSessionCategoryRecord because we want to sample the audio by recording through the microphone. The mode is set to AVAudioSessionModeMeasurement since the purpose of the app is to measure the audio.
Next on, we initialize the microphone for AudioKit. We first enable audio input, then initialize mic, tracker, and silence as AKMicrophone, AKFrequencyTracker and AKBooster. AKMicrophone is just the microphone class for AudioKit, AKFrequencyTracker is a well-implemented frequency tracker which analyzes sound waves to obtain the frequency of the input audio. AKBooster is a stereo mixer, we initialize it by our frequency tracker and set it as the output of AudioKit.
After the initialization, we implement two simple functions: start() and stop(), which starts off audio polling of the tuner and terminates it respectively.
|
|
In the start function, we call AudioKit.start() to turn on the polling through microphone which we initialized earlier. We then schedule the pollingTimer to repeatedly tick every 0.05 second. The pollingTick() function will be called every tick, which we will implement later. The stop() function is more straightforward, we call AudioKit.stop() to stop polling audio, and .invalidate() to cancel the pollingTimer.
Moving on to the pollingTick() function:
|
|
We get the current raw frequency of the audio simply by calling tracker.frequency, then pass it in to Pitch.makePitchByFrequency() to get the pitch of the nearest note. By doing so, we can now calculate the error ratio of the raw frequency by dividing it by pitch.frequency. errRatio will then be a number between 0.5 and 2.0 such that frequency * errRatio == (Frequency of the nearest note [aka pitch.frequency]).
Lastly, we inform other delegate classes by calling the tunerDidTick(pitch:errRatio) function. The delegate protocol should be implemented as thus. (The code should be written out of the Tuner class.)
|
|
The view class could then utilize the Tuner class by adopting the TunerDelegate protocol, calling start() to start, implementing tunerDidTick(pitch:errRatio:) to receive processed information of the tuner, and calling stop() to stop the tuner.
Nice.