
Two weeks ago, I wrote an article about some camera moving schemes used in Metal Slug 3. In this article, I will show you how to actually implement such a camera.
I will be using the open source Godot Engine with GDScript since I believe any programmer with could understand GDScript quite easily, so let’s get started.
First, let’s define some variables we’ll use later.
|
|
The drag_margin_left and drag_margin_right variables represent the red and blue lines of the image below.
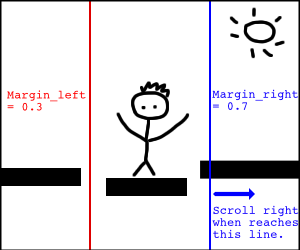
When the character reaches the red line, the screen will scroll left. Similarly, when the character reaches the blue line, the screen will scroll right.
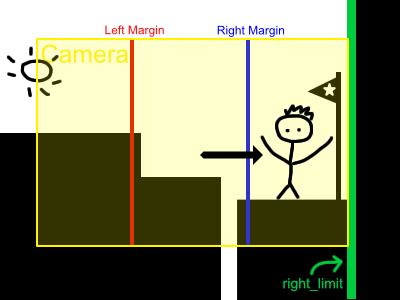
Now comes the important right_limit and left_limit variables. They limit the camera so that it won’t scroll past the right or left most edge of a scene or level. For example, in the image below, though the character reaches the blue line, the camera won’t scroll, since it already reaches the right limit of the scene.
screen_size simply stores the width and height of the game screen in a 2D vector. I will only be using screen_size.x (aka. the width of the screen) in this article since horizontal scrolling is our main concern. (Vertical scrolling is just the same as horizontal scrolling.)
After declaring the variables, let’s move on to write some short functions.
|
|
In Godot Engine, the _ready() function would be called after the node as well as its children are loaded. All we do here is setting the size of the viewport (aka. screen) to screen_size.
The update_viewport() function is a little more complicated. Since our camera is just a plain node in the scene, we have to update the viewport to actually make the screen scroll. get_viewport().get_canvas_transform() returns the canvas transform in a 3x3 2D array where canvas_transform.x and canvas_transform.y controls the rotation and scale of a canvas item, and canvas_transform.x controls the translation of a canvas item. (Well, this description is kind of oversimplified, please refer to this link if you are interested in the details of the mathematical meaning of .x, .y, and .o.) We will only be using canvas_transform.o since we won’t rotate or scale our screen when scrolling. We set canvas_transform.o to -self.get_global_pos() + screen.size() / 2 so that the center point of the viewport would align with the center point (aka. self.get_global_pos()) of the camera. You might wonder why there is a negative sign in the front of self.get_global_pos(). This is not that intuitive, but what we do is redefining the origin point of the canvas transform. Think of offsetting instead of translating the canvas transform.
Now whenever the camera moves, the screen (viewport) will reposition itself so that their center points always align. Then comes the most important part: how we actually move the camera?
To move the camera, we declare another function, update_camera(character_pos). Whenever the character moves, it should call this function in the camera node, passing in its position as the parameter.
|
|
The code first checks whether the character reaches the right margin of the camera. If it does, then move the camera right.
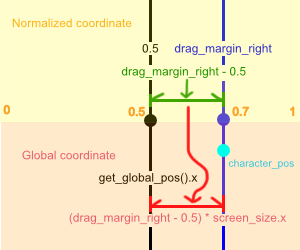
Since we are using two different coordinate systems, we have to transform them before comparison and assignment. Our first coordinate system is the Normalized Coordinate, which starts from 0 on the left edge of the screen and ends at 1 on the right edge of the screen. The second coordinate system is the Global Coordinate. This is the actual coordinate of the screen where the camera, character reside in. It starts from get_global_pos() - screen_size.x / 2 on the left edge of the screen and ends at get_global_pos() + screen_size.x / 2 on the right edge of the screen. So, to transform from Normalized Coordinate to Global Coordinate, we have to multiply it by ((get_global_pos() + screen_size.x / 2) - (get_global_pos() - screen_size.x / 2)) (aka. The distance of left edge to right edge). The image below shows the two coordinate systems. Note that we use Normalized Coordinate for right_margin and drag_left_margin, and Global Coordinate for character_pos.
The left margin check is similar to the right margin check. Only that the signs are reversed.
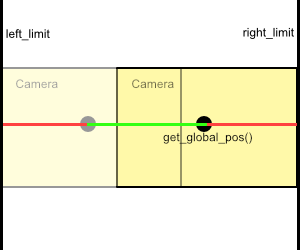
Next, we clamp the new camera position so that it is within the limits of the scene. This is quite straightforward if you look at the image below. The camera can only scroll within the green line. The red lines are forbidden so that the camera won’t scroll past the level boarders, rendering some unwanted stuff over the borders.
Lastly, self.set_global_pos(new_camera_pos) is called to set the position of the camera to the new position, and update_viewport() is called to actually scroll the viewport.
Conclusion
This script is all we need to perform “Metal Slug 3”-like camera scrolling.
Single Static Line Scrolling
For Single Static Line Scrolling, simply set drag_left_margin to 0 to prevent the camera from scrolling to the left, and set drag_right_margin to somewhere around 0.3-0.4 so that the screen would scroll further to the right when the character reaches 30%-40% of the screen width to the right.
Limited Scrolling
Limited Scrolling could be done by assigning right_limit and left_limit to the right and left of the limited area. drag_left_margin and drag_right_margin could be reset to around 0.1 and 0.9 respectively if the limited area is larger than the screen (like the scene below).
Reposition Scrolling
To perform Reposition Scrolling, just remove expand the right_limit of the script, and the character would snap back to drag_right_margin. However, if you want the snapping to look smoothly like in Metal Slug 3, you might want to do some Lerping every frame to gradually move the camera to its target position.
Constant Speed Scrolling
Well, Constant Speed Scrolling could be done even without this script entirely. Just increment the position of the camera every frame and it is done.
The source code of this article can be found on my GitHub: Link.